This is a detailed guide on how to integrate Web SDK in a mobile App with WebView Content.
Use cases for using Web SDK on an app
If your mobile App is a mirror of your website, i.e. the website is embedded inside a web view or your mobile App is a PWA, then Web SDK is the perfect solution for your App, especially if you want to include the Web SDK in both your website and mobile App.
Can I enable Web SDK only if my website runs inside a WebView?
Yes, There are many ways to do that.
One of the ways to do that is to pass a contract keyword from the mobile App to the WebView when building the WebView component.
Run the below when building the WebView in Android.
webView.also {
   it.settings.javaScriptEnabled = true
   it.settings.domStorageEnabled = true
   it.addJavascriptInterface(WebAppInterface(it), "AndroidUtiq")
   it.loadUrl("https://utiq-test.brand-demo.com/utiq/mobile/mobile-page.html")
}
iOSUtiq and AndroidUtiq are just examples but they can be anything.
Run the below when building the WebView in iOS.
let contentController = self.webView.configuration.userContentController
contentController.add(self, name: "iOSUtiq")
On the WebView JavaScript, check for this contract in the window object and add your logic.
if (window.webkit && window.webkit.messageHandlers && window.webkit.messageHandlers.iOSUtiq) {
   console.log('Running inside iOS webView');
} else {
   console.warn('No Webkit available in the window object');
}
if (window.AndroidUtiq) {
   console.log('Running inside Android webView');
} else {
   console.warn('No AndroidUtiq available in the window object');
}
ATT user choice for iOS
There are many use cases where a WebView might need to communicate directly with native, consider the following scenario on iOS. The AdTechPass should only be returned after showing the ATT to the user, so the following can be done.
-
At some point in the WebApp, the Web SDK will be loaded/Initialized.
-
User should accept or reject Utiq consent.
-
WebView will ask the App to show the ATT Popup (different from the consent Popup).
-
After the user accepts or rejects the ATT, the result will be posted back to the WebView.
-
Based on the result from the previous step, the AdTechPass will or won’t be returned.
Integration of Web SDK in the app WebView
Having understood why and how communication from the native app to the web view, and vice versa, can be achieved, we need to integrate and initialize the Web SDK in the app’s WebView.
Onboarding Details
As described on Onboarding Process, we would need the below onboarding details:
-
Data Controller: The legal entity that appears in the domain’s Privacy Policy page
-
Domain: Domain name (e.g. example.com)
-
Cross-domain MarTechPass: Same MarTechPass for user on domains of same Data Controller
-
Staging Details: Domain's staging (e.g. http://example.com/?testUtiq=1, stg.example.com or stgexample.com)
-
Email addresses for testers: To which we will provide testing stubs as described in Testing
-
Confirm CNAME creation: For each of the domains in scope a Utiq subdomain should be created, e.g., for domain
example.coma subdomainutiq.example.comshould be created and set to point tofrontend.prod.utiq-aws.net. The default setup for the SSL certificate uses Let’s Encrypt and is management automatically by the Utiq platform.
Privacy Requirements
Dedicated guidelines for Utiq Privacy Requirements and Consent Experience on Mobile App can be found at this page: Consent Experience on Mobile App
As described in the Requirements for Advertisers and Publishers, you will need to implement the following:
Manage Utiq page
Create the Manage Utiq page and add a Manage Utiq footer link on all the pages of your website, as described on Setup the dedicated “Manage Utiq” page linked via a footer hyperlink. From this page, a user should be able to easily revoke Utiq’s consent and delete data collected by Utiq.
Privacy Policy update
Add a reference to Utiq technology in your existing Privacy Policy page of the website, as described on Include reference to Utiq technology in the domain’s privacy statement.
Flow Chart
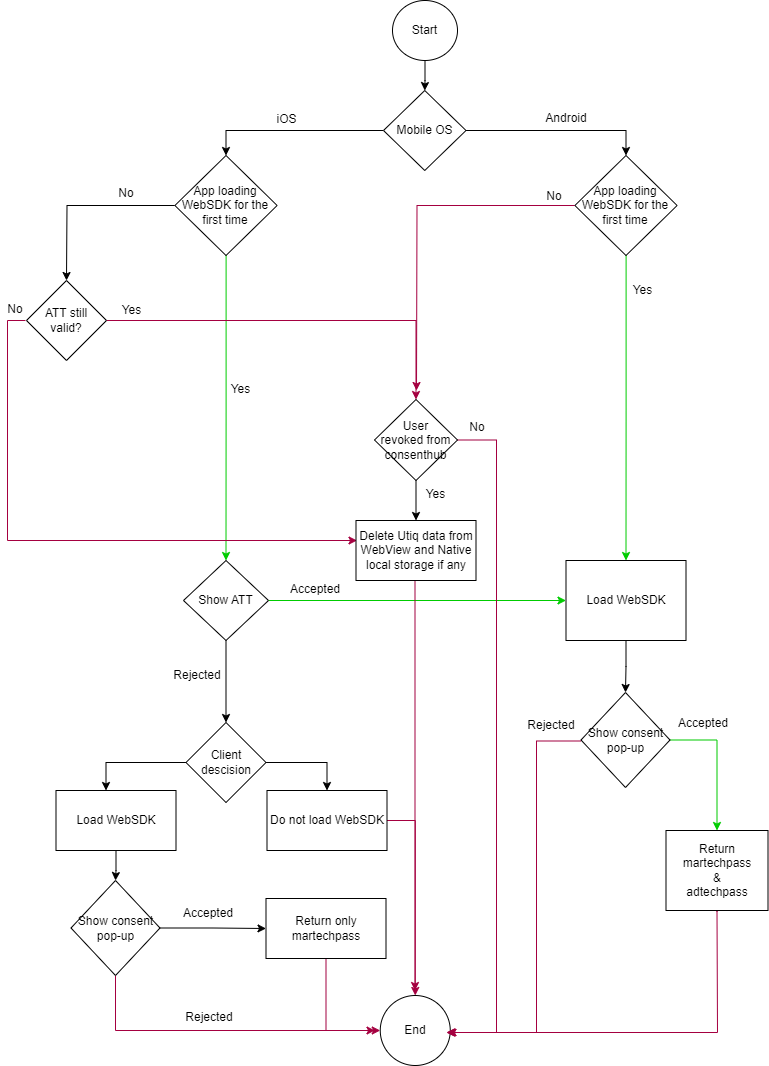
Sequence Diagram
Below you can see the integration sequence diagram, while the steps are described in the User Journeys section.

User Journeys
Below you can find user journeys, described in detail.
Consent Experience
-
A user visits the native app and consents to Utiq, Here you will need to use your own Integrated Model consent, following our requirements described in Option A: Integrated consent model.
Certain Utiq text needs to be added on the consent 1st layer, Utiq purpose to be added on 2nd layer (purposes), and Utiq to be added as vendor. You should store the Utiq consent on the native storage. -
Load Utiq Web SDK, On the WebView, you will need to load Utiq Web SDK, configuring the SDK to not show the separate pop-up. On the WebView, you should pass Utiq consent & ATT choice (if iOS) and pass it to the Web SDK (to not return adtechpass)
-
Pass Utiq consent to the Web SDK, Use handleConsentChange(true) API to inform Web SDK that Utiq consent has been granted, so relevant workflow calls will be triggered to set the IDs.
-
Store Utiq IDs on app native storage: You can pass the martechpass and the adtechpass from the WebView and store them in the app native local storage if needed, You should use getIdGraphEntry() to collect them from the WebView localStorage.
iOS ATT Synchronization
Apple gives users an option to change or withdraw ATT from the App settings, this can be done even while the App is not open.
-
Go to Settings > Privacy & Security > Tracking to see a list of apps requested to track your activity.
-
Tap to turn off or on the permission track for a specific app.
In this case, if ATT was accepted, then rejected later, there should be a way to check the ATT status periodically, for example on each App start and remove AdTechPass if previously set.
-
User rejects ATT from App settings
-
When the app starts, check ATT status and, if now rejected, pass it to the WebView
-
Pass the ATT choice to Utiq Web SDK
-
The Web SDK will update Utiq IDs on WebView localStorage, setting only martechpass
-
Based on the above, you will need to remove the adtechpass from native storage
Consent Synchronization
In this journey, the user might go to https://consenthub.utiq.com/ and revoke his consent from there. In this case, you will need to do a periodic check with Utiq Web SDK, to check for consent validity.
Utiq Web SDK is doing consent validity checks every 10 minutes automatically, on subsequent page views.
-
User visits the app
-
On the WebView, load the Web SDK - it will do consent sync on it’s own
-
You must listen to onConsentUpdateFinished event listener
-
If it returns with ‘false’, then
-
Web SDK will delete Utiq IDs from WebView
-
You should delete Utiq consent from the native app
-
You should delete Utiq IDs from the native app
-
-
If it returns with ‘true’, then
-
Web SDK will update Utiq IDs on WebView
-
You should update Utiq IDs on the native app
-
-
Consent Revocation
Consent Revocation from CMP
In this journey, the user might go his own Integrated Model CMP and reject Utiq at a later stage, if previously accepted. In this case we will need to synchronize the consent and delete Utiq consent from the Web SDK, while removing all IDs from WebView and native storage.
-
A user visits an App and revokes Utiq consent from Integrated Model CMP
-
You will need to remove Utiq consent status from the native storage
-
You will need to open a WebView, initialize Utiq Web SDK and trigger handleConsentChange(false) API
-
The Web SDK will remove all Utiq IDs from the WebView localStorage
-
Based on the above, you will need to remove all Utiq IDs from the native local storage
Consent Revocation from Manage Utiq page
In this journey, the user might go to the Manage Utiq page - as per the above requirements - and do a ‘one-click-revoke’ action, from a respective feature. In this case, the Web SDK will automatically delete all stored Utiq data from the WebView, but you should also delete all Utiq IDs from the native local storage.
Note that visiting the Manage Utiq page here implies that the user visits the Manage Utiq page URL, hosted on the actual websites, in the app’s WebView.
-
A user visits an app and goes to manage Utiq page
-
The Web SDK should be initialized on this page, as well
-
A user clicks the ‘one-click-revoke’ feature, where you have put revokeConsentWithPopup() as a link
-
The Web SDK will remove all Utiq IDs from the WebView local storage
-
Based on the above, you should remove all Utiq IDs from native storage
-
A user will see an automatic Utiq consent revocation confirmation pop-up