Configuration in Sourcepoint console
This section provides guidance for both:
-
Clients that want to start from a new template → follow section “Enable “Utiq_Template” to set up a new message in Sourcepoint within portal account” section; and
-
Clients integrating Utiq into an existing consent message in Sourcepoint → follow “Integrate Utiq to an existing consent message in Sourcepoint within portal account” section.
If you need assistance, please contact onboard@utiq.com
Enable “Utiq_Template” to set up a new message in Sourcepoint within portal account
Sourcepoint’s team has created a “Utiq_Template”, allowing clients to easily start from this template directly in the message builder within their portal account.
Clients should let their Sourcepoint account manager know that they are integrating with Utiq so they can enable the template in the Sourcepoint master account.
Configuration steps for “Utiq_Template” in Sourcepoint
When “Utiq_Template” has been enabled, proceed with the following steps:
Vendor list configurations
-
Add Utiq as a custom vendor in the vendor list (Sourcepoint’s documentation here)
This change could trigger a reconsent on the clients site depending on their scenario settings. Please get in touch with your Sourcepoint account manager, if needed.
-
Add a “custom purpose” to the vendor list (Sourcepoint’s documentation here).
-
Make sure the legal basis for Utiq vendor is ‘user consent’ for the Utiq custom purpose. All other IAB/Custom purposes should be set as ‘not applicable’.
Message Builder configurations
-
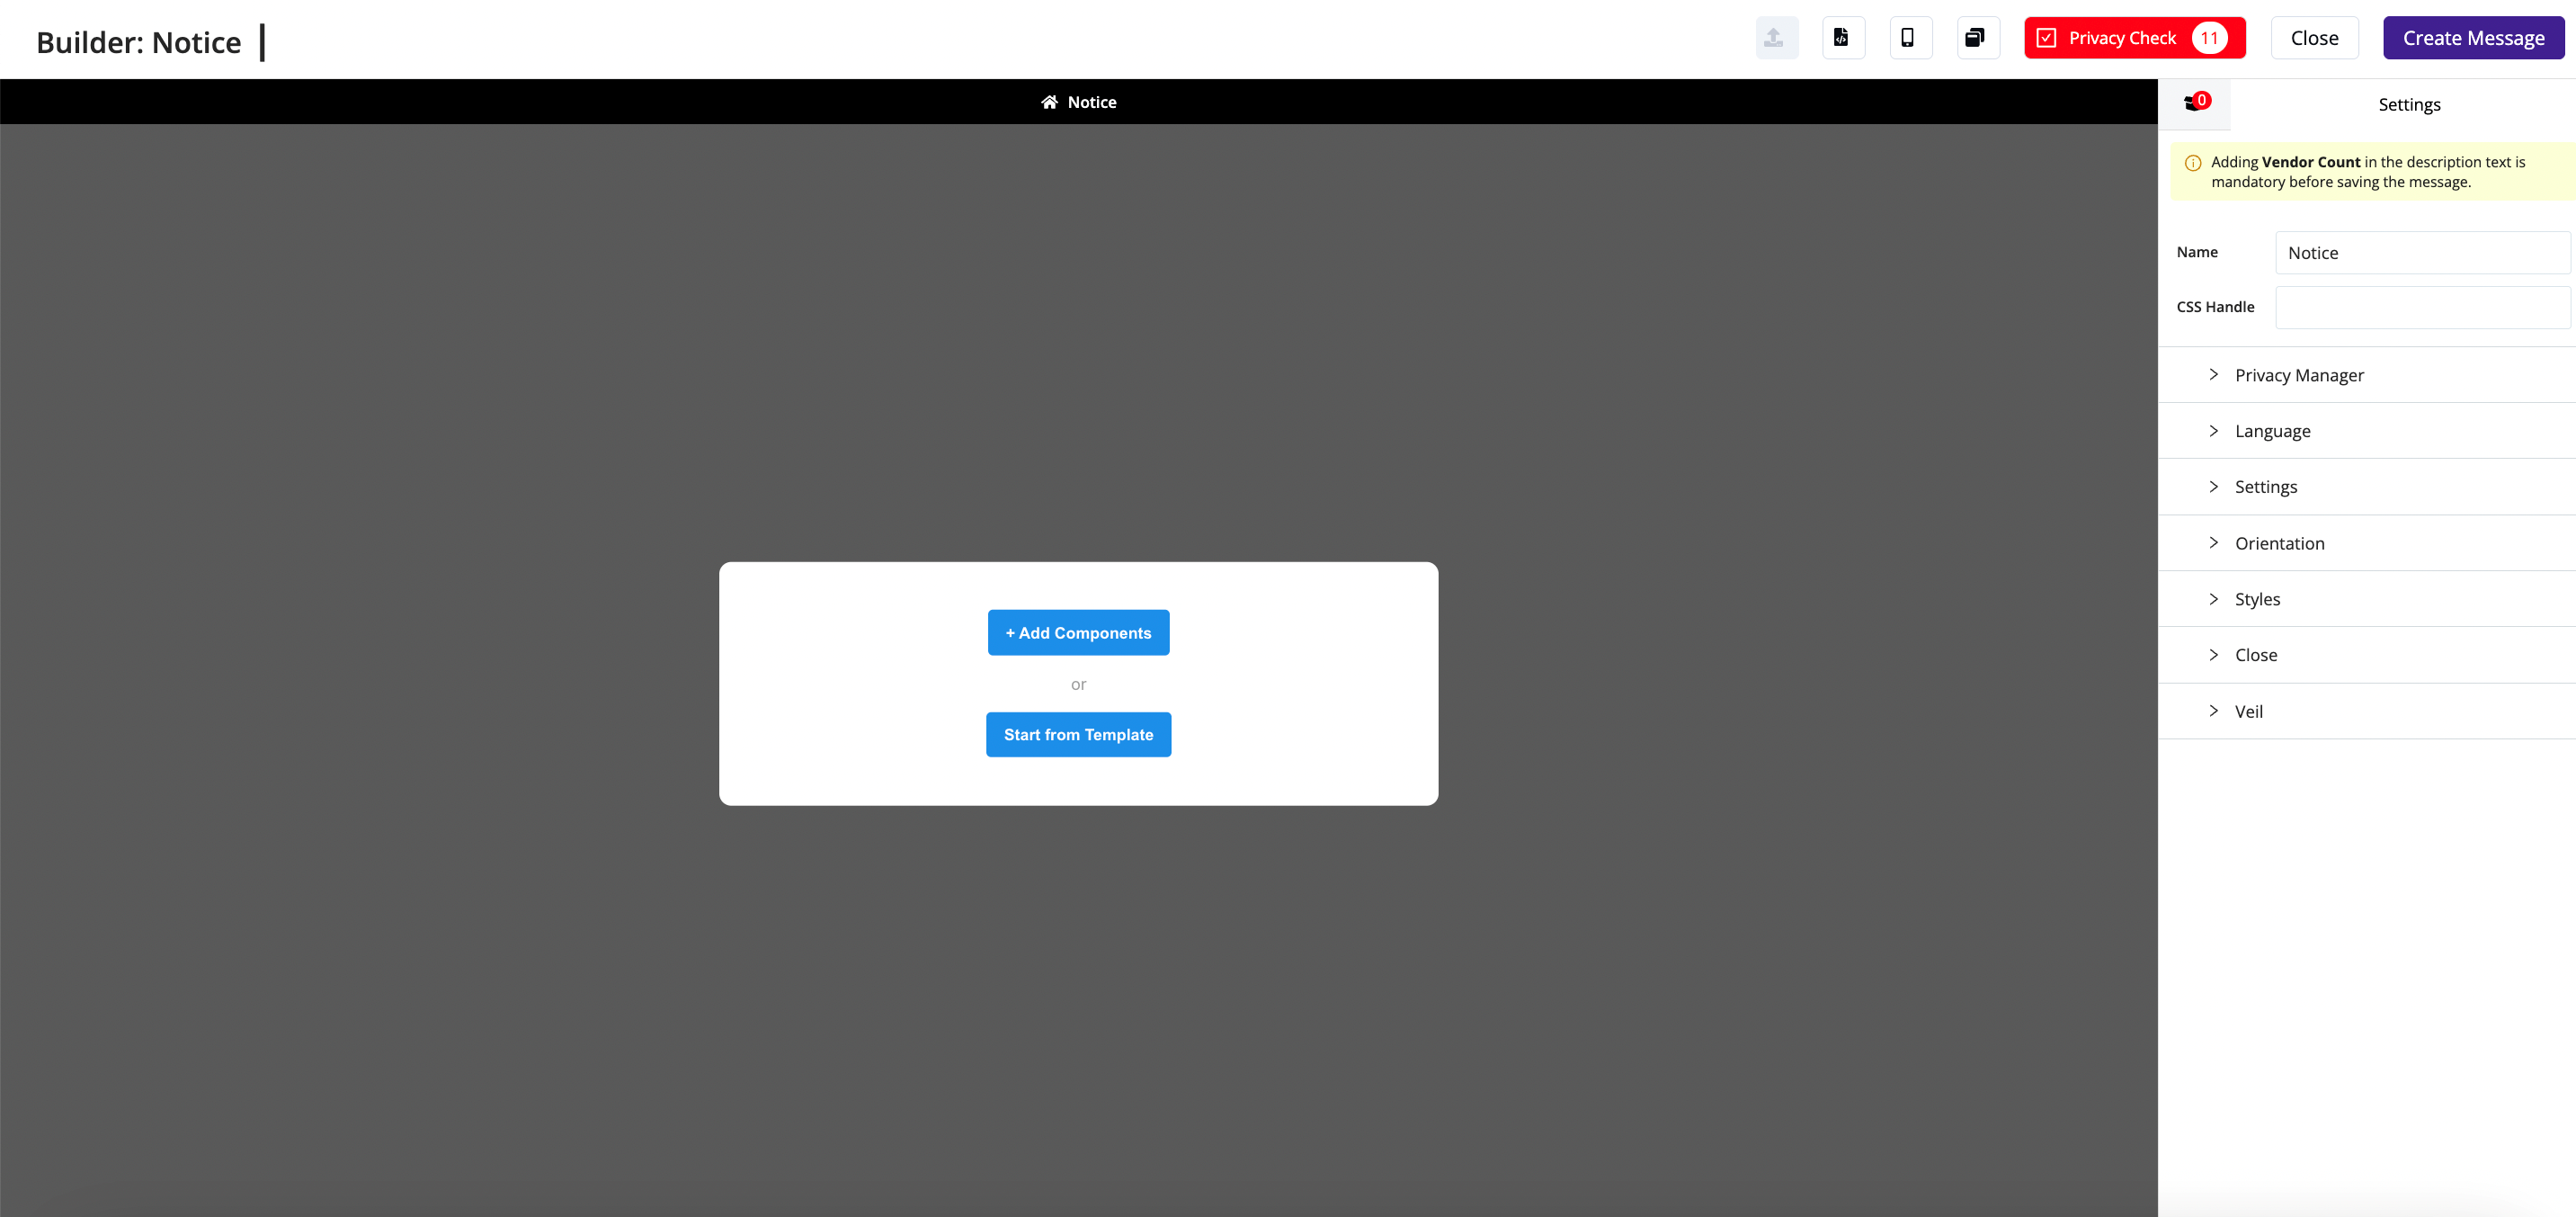
The first half of Sourcepoint’s documentation here, shows how to get to the message builder in Sourcepoint portal and to press ‘+ new message’
-
Select ‘start from template’:
-
Select the template named ‘Utiq_Template’
-
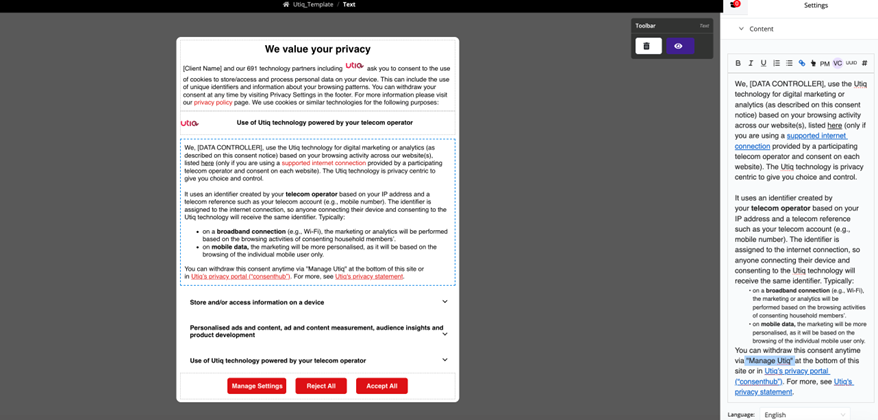
Proceed to edit Utiq's text clickable elements as well as complete Utiq's text configurable elements.
To edit the content, click on the text in the message builder and dropdown content from the right-hand side menu.
To add a hyperlink, highlight the word in the content dropdown and click on the link icon (highlighted in blue) to enter the URL.
Please press save and then refresh the campaign (in the campaign page) to push any first layer changes into production.
You can find the Utiq's text clickable elements and Utiq's text configurable elements as explained in the sections below.
Integrate Utiq to an existing consent message in Sourcepoint within portal account
Configuration steps for integrating Utiq into an existing consent message in Sourcepoint
Vendor list configurations
-
Add Utiq as a custom vendor in the vendor list (Sourcepoint’s documentation here).
-
Add a “custom purpose” to the vendor list (Sourcepoint’s documentation here).
-
Make sure the legal basis for Utiq vendor is ‘user consent’ for the Utiq custom purpose. All other IAB/Custom purposes should be set as ‘not applicable’.
This change could trigger a reconsent on the clients site depending on their scenario settings. Please get in touch with your Sourcepoint account manager, if needed.
Message Builder configurations
-
Navigate to the message you want to integrate Utiq with
-
Add the Utiq logo (this must be positioned next to “technology partners”)
To add the logo, you will need to add a full stop next to “technology partners.”
Hyperlink the full stop. To add a hyperlink, highlight the word in the content dropdown and click on the link icon
Add the following link url: https://sourcepointlink.com
Add the below custom CSS into the CSS builder:CSSa[href="https://sourcepointlink.com"]{ pointer-events: none !important; background: url('https://utiq.com/wp-content/uploads/2023/05/utiq-logo@2x.png') no-repeat !important; background-size: contain !important; width: 40px !important; height: 15px; display: inline-block !important; vertical-align: middle !important; margin: 0 3px !important; } -
Add the Utiq text title and logo on the same line
The text title can be added via a text component in our message builder.
For the logo, add an image component and insert the Utiq URL in content: https://utiq.com/wp-content/uploads/2023/05/utiq-logo@2x.png -
Add Utiq body of content
The content can be added via a text component in our message builder.
See guidelines here. -
Proceed to edit Utiq's text clickable elements as well as complete Utiq's text configurable elements.
To edit the content, click on the text in the message builder and dropdown content from the right-hand side menu.
To add a hyperlink, highlight the word in the content dropdown and click on the link icon (highlighted in blue) to enter the URL.
Please press save and then refresh the campaign (in the campaign page) to push any first layer changes into production.
You can find the Utiq's text clickable elements and Utiq's text configurable elements as explained in the sections below. -
To avoid any overflow of the Utiq purpose text on CMP 1st layer accordion, add the below custom CSS into the CSS builder:
CSS.stack-container { overflow-y: scroll !important; }
Utiq’s configurations: set up the functionalities in the Utiq text
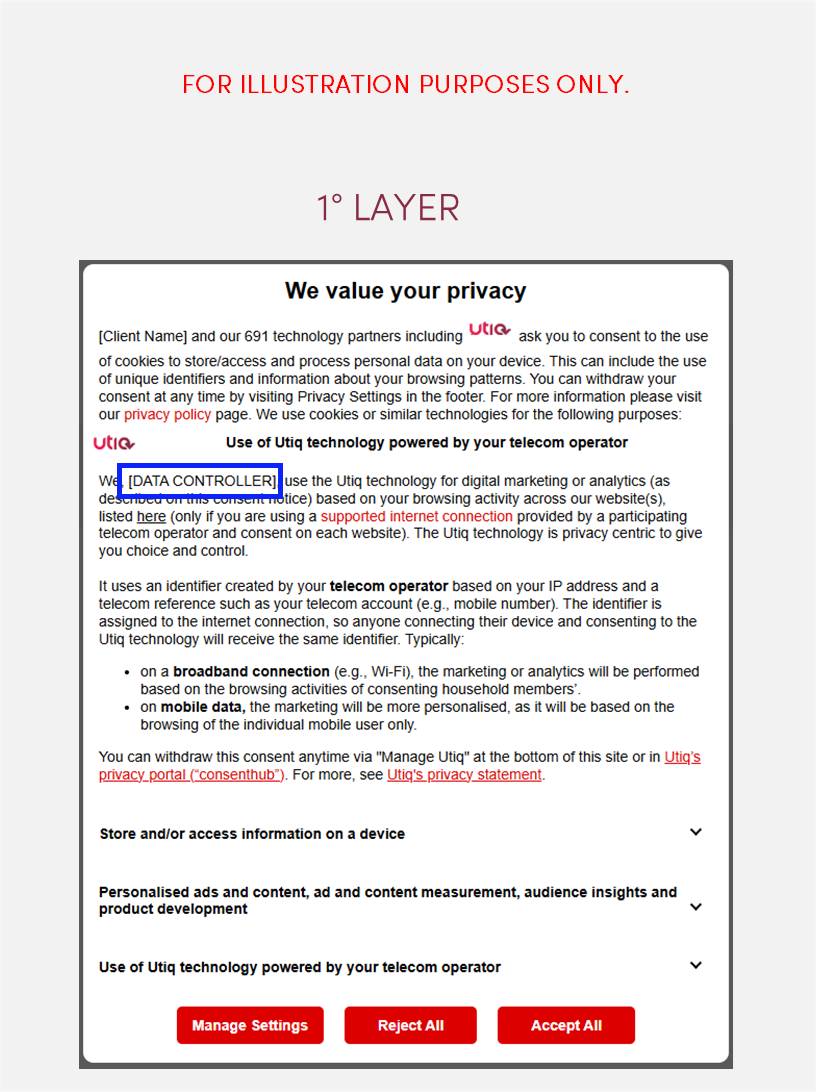
1st layer
Utiq consent text (1st layer)
-
Utiq consent text (1st layer) for “Integrated Model” can be found here.
-
Utiq consent text (1st layer) for “Consent or Pay Model” can be found here.
IMPORTANT NOTE: for Consent or Pay Model integrations only, due to some limitations in Sourcepoint, Utiq adapted some of the text and requirements as described below.
Limitation: The standard requirement specifies that the 1st Utiq consent text could be added in the accordion section, while the 2nd Utiq consent text should be placed in the Utiq custom purpose. However, Sourcepoint currently does not support using two different texts for these layers: both sections must share the same text content.
Solution: To address this limitation, a single, unified text has been created that combines elements from both the 1st and 2nd Utiq consent texts. This mixed version can be used in both sections. The text to be used can be found below:
Use of Utiq technology powered by your telecom operator
If you consent and use a supported internet connection, we, [DATA CONTROLLER], will use marketing identifiers provided by Utiq for advertising or analytics activities. This involves the following:
-
Eligibility check: Utiq uses your IP address to check if you’re using a supported internet connection. If you are not, Utiq will not be activated.
-
Utiq technology activation: Utiq works with your telecom operator, which will use your IP address against internal data (e.g. mobile number), without disclosing it, to help create the marketing identifiers. These are stored in your browser with first party cookies and other device storage information.
-
Sharing and use of identifiers: We use the marketing identifiers to link browsing activity across our property(ies) where Utiq consent is given, including of others using the your same connection, for advertising or analytics purposes. Certain Utiq identifiers are also shared with platforms that work with us and/or Utiq, as part of the advertising or analytics process.
You can reject now in the [BUTTON LABEL TO OPEN THE 2ND LAYER] (click “Reject” for “Use of Utiq technology powered by your telecom operator”) or withdraw consent later via "Manage Utiq" or in Utiq’s privacy portal (“consenthub”). If you “[BUTTON WORDING FOR PAY OPTION]”, Utiq will not be used.
You confirm that you are the connection account holder’ or have permission to activate Utiq.
For more, visit Utiq's privacy statement.
Languages supported
Utiq provides both translations and support for the following languages: EN, DE, ES, FR, IT, CA. Please add your translations directly into the Utiq template via Sourcepoint’s message builder.
Configurable elements
The Utiq consent text contains configurable elements.
You will need to populate dedicated configurable elements with your details:
-
[DATA CONTROLLER]: Data Controller’s name and legal form → the legal entity that owns the website as mentioned on the website’s Privacy Policy page
-
(for Consent or Pay Model only): [BUTTON WORDING FOR PAY OPTION] → label/wordings used for the “Pay” option button
-
across our property(ies) → https://consenthub.utiq.com/pages/digital-properties?domain=[INSERT DIGITAL PROPERTY] with already pre-filtered the digital property (e.g. website/app) the user is coming from.
Clickable elements
The Utiq consent text (1st layer and Utiq purpose displayed in the 2nd layer of the CMP) contains clickable elements.
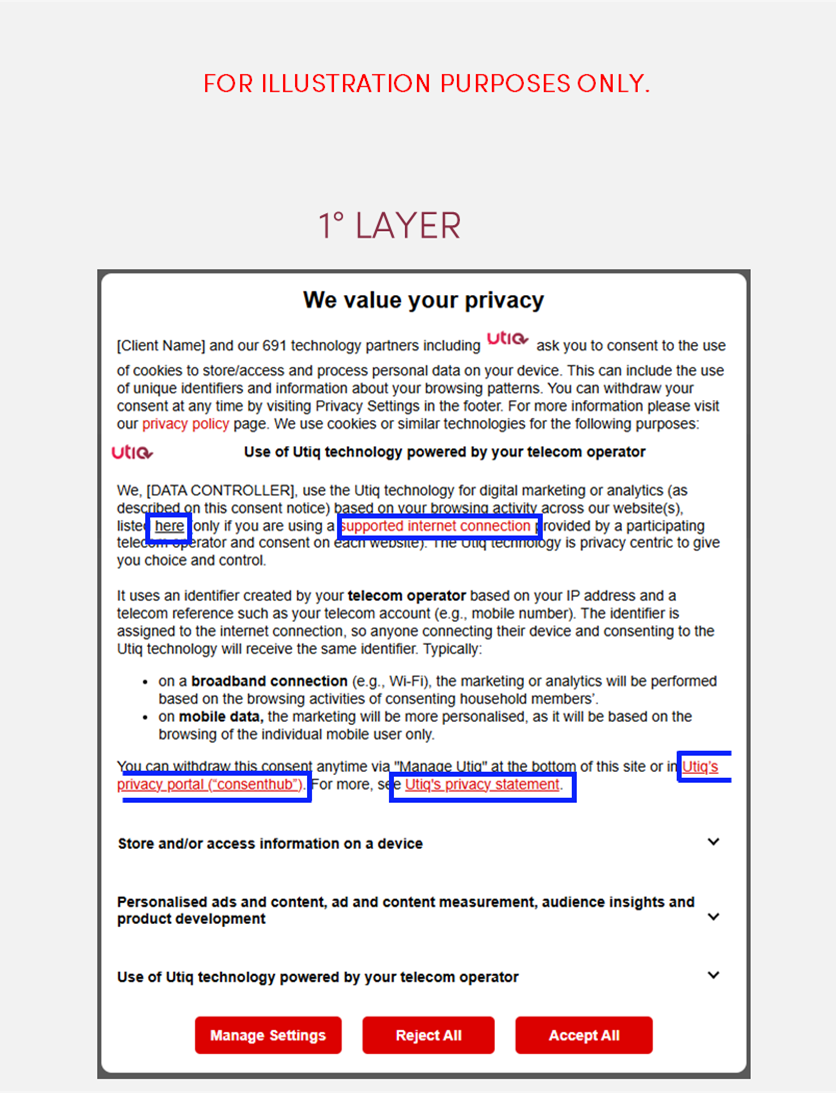
You will need to implement hyperlinks that open in a new page for clickable elements within Utiq consent text:
-
consenthub: https://consenthub.utiq.com/
-
Utiq’s Privacy Statement: https://consenthub.utiq.com/pages/privacy-statement
-
telecom operator / supported internet connection: the reference to participating telecom operators in scope within the Utiq consent text must be correctly hyperlinked and direct the user to the relevant section within Utiq’s Privacy Statement containing the list of all participating telecom operators per country → https://consenthub.utiq.com/pages/privacy-statement#telecom-operators
-
our other websites / listed here / across our property(ies) → https://consenthub.utiq.com/pages/digital-properties?domain=[INSERT DIGITAL PROPERTY] with already pre-filtered the digital property (e.g. website/app) the user is coming from (e.g. example.com - without www). This page lists the cross domain websites in scope (i.e., all digital properties that would make use of the same martechpass value), providing transparency also on Group of companies and Data Controllers
-
for advertising or analytics activities → this function will open the Advertiser/Publisher’s own privacy statement.
-
(for Consent or Pay Model only): You can reject Utiq now → a function to open the second layer of the CMP.
IMPORTANT NOTE: for Consent or Pay Model integrations only, due to some limitations in Sourcepoint, Utiq adapted some of the text and requirements as described below.
Limitation: According to the standard requirement, “reject Utiq now” text element in the 1st layer of Utiq consent text must be clickable and open the 2nd layer. However, since the same text is used for both the 1st and 2nd layers, this creates a loop issue: clicking the text within the 2nd layer would attempt to reopen the same layer repeatedly.
Solution: To prevent this loop behavior, the clickable function has been replaced with additional instructional text. This text guides users on how to access the 2nd layer manually. The text to be used is the following:
You can reject now in the [BUTTON LABEL TO OPEN THE 2ND LAYER] (click “Reject” for “Use of Utiq technology powered by your telecom operator”) or withdraw consent later via "Manage Utiq" or in Utiq’s privacy portal (“consenthub”). If you “[BUTTON WORDING FOR PAY OPTION]”, Utiq will not be used.
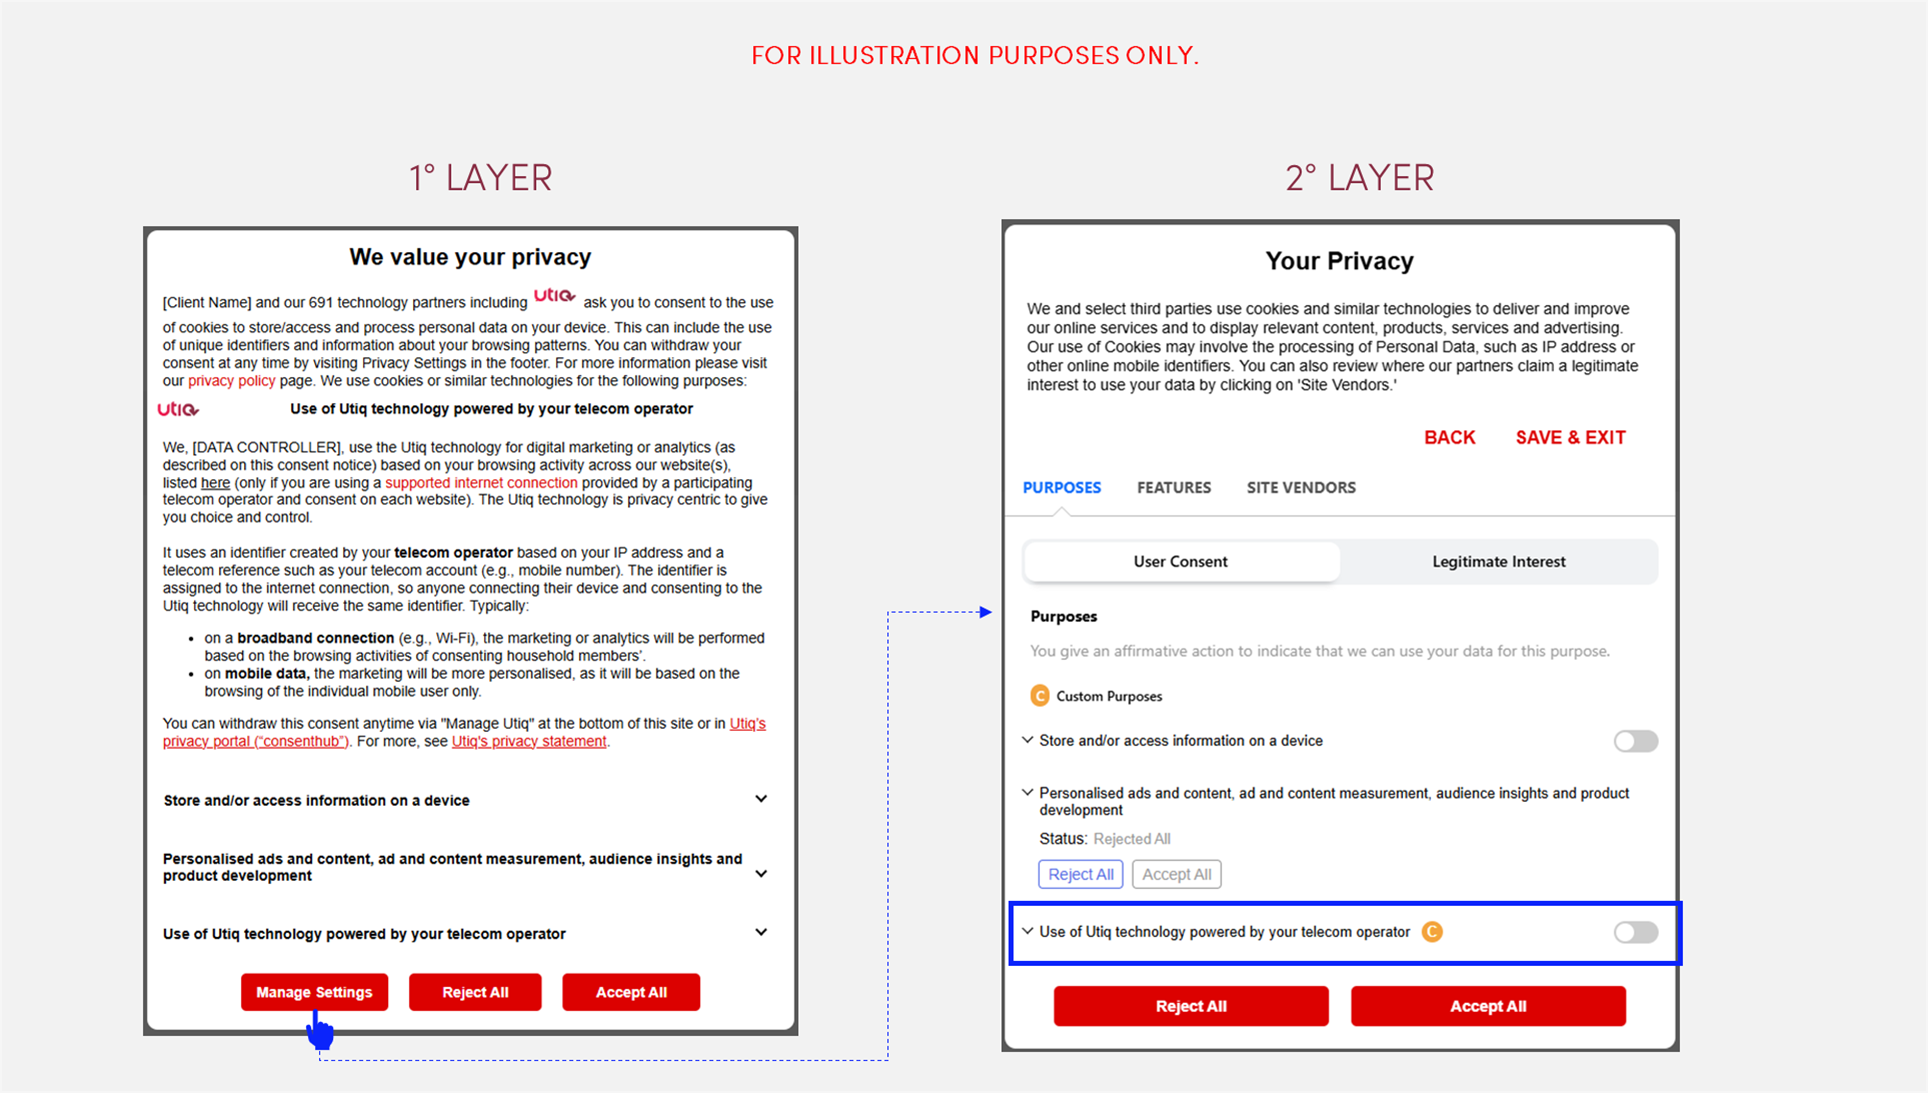
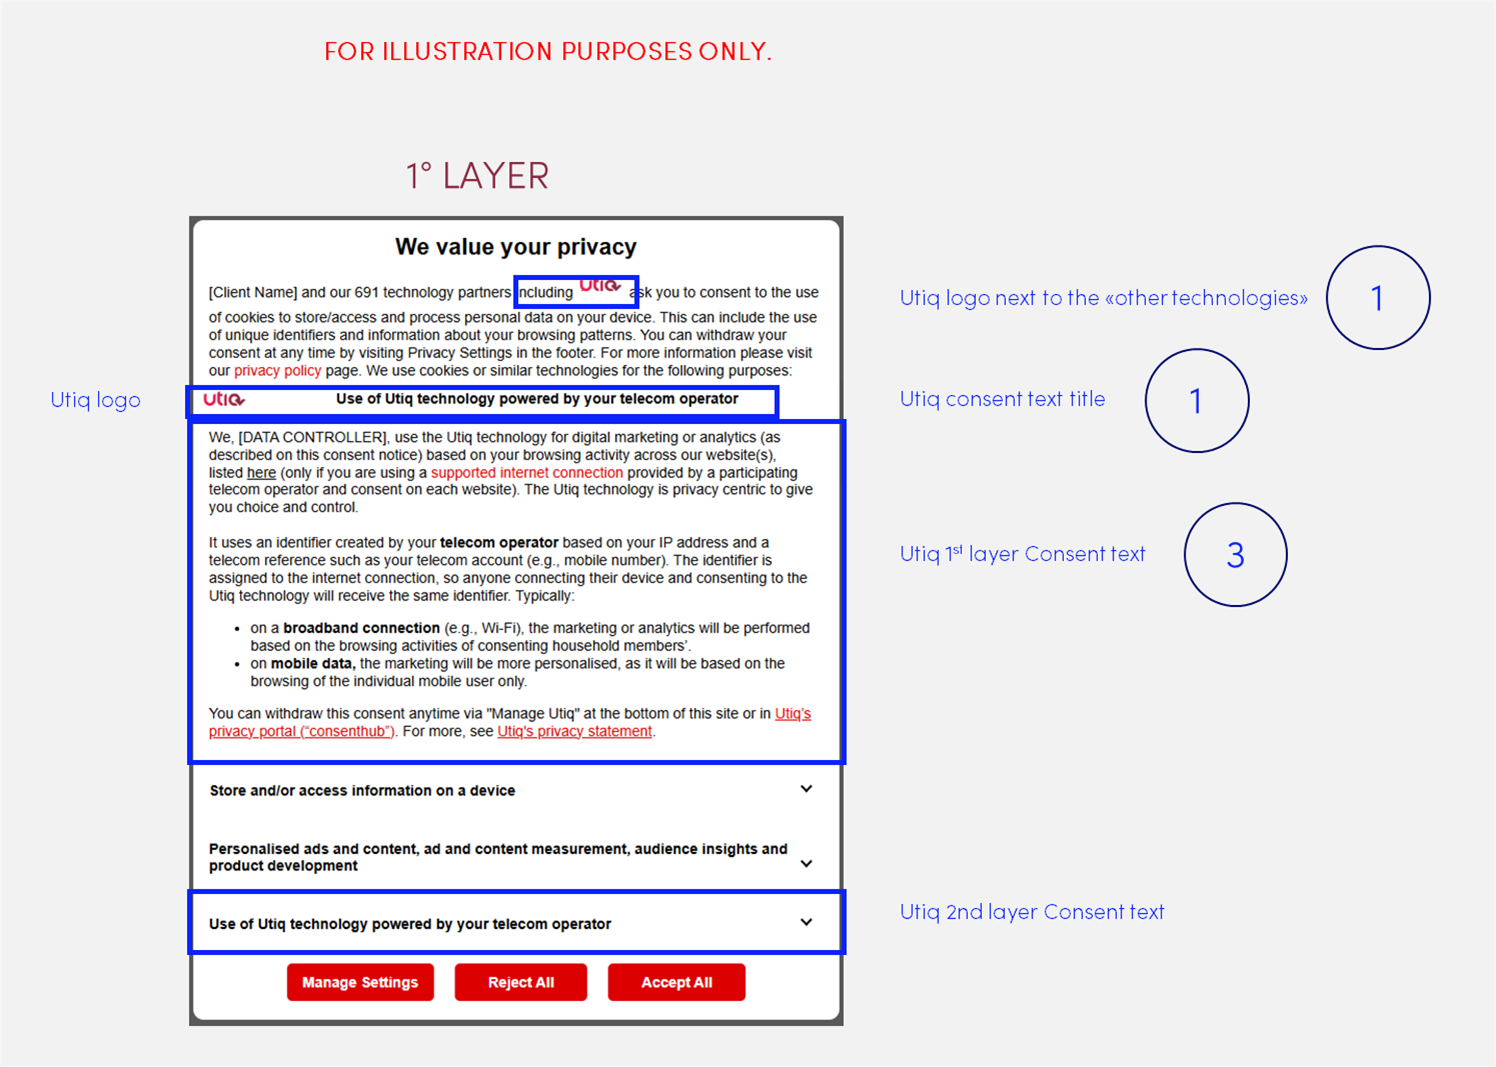
(1) Utiq logo next to "other similar technologies"
In case scrolling is required to view Utiq consent text, Utiq logo must be placed in a fully visible section of the CMP (logo must be clickable and, if clicked, to scroll automatically to the Utiq section).
The most logical place is expected to be next to the mention of use of similar tracking technologies.
Please add Utiq logo, using the following code - remember to optimize the style attribute:
(including <span><svg xmlns="http://www.w3.org/2000/svg" fill="none" style="vertical-align:baseline;width:2em !important;padding-top:0.2em" viewBox="0 0 83 27"><path fill="#ed174c" d="M31 6v14q2 11 12 12v-6q-5-1-5-6v-9h5V6h-5V0q-6 1-7 6m26 13q1 12 13 13h7q0-5-7-6-6-1-7-7 1-7 7-8 7 0 8 7l-2-2-5 4 12 12 13-13q-4-3-8 0l-5 5 1-5Q83 6 70 5 58 6 57 19m-36-7v7q0 7-7 7-7-1-8-7V6H0v13q1 12 14 13 12-1 13-13V6q-5 0-6 6m26 0v20h6V6q-5 1-6 6"></path></svg><span style="position: absolute; width: 0; height: 0; clip: rect(0 0 0 0);">Utiq</span></span>)
(2 - 3) Utiq title, Utiq logo and Utiq consent text (1st layer)
Add the Utiq title, Utiq logo and Utiq consent text (1st layer) in your Sourcepoint CMP 1st layer.
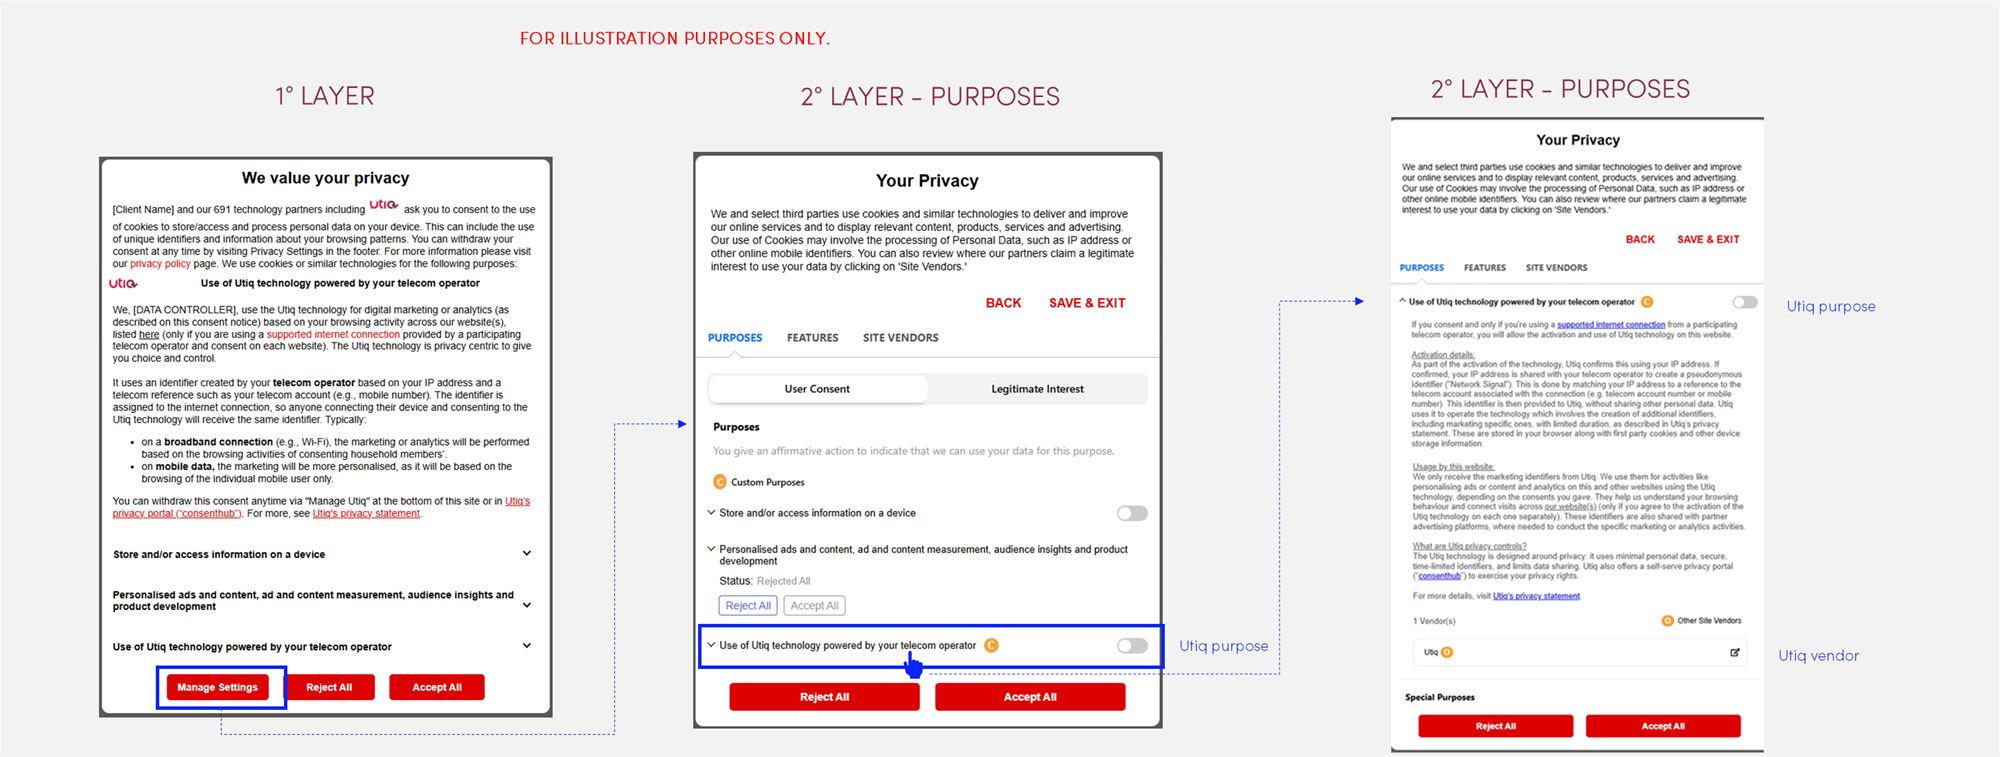
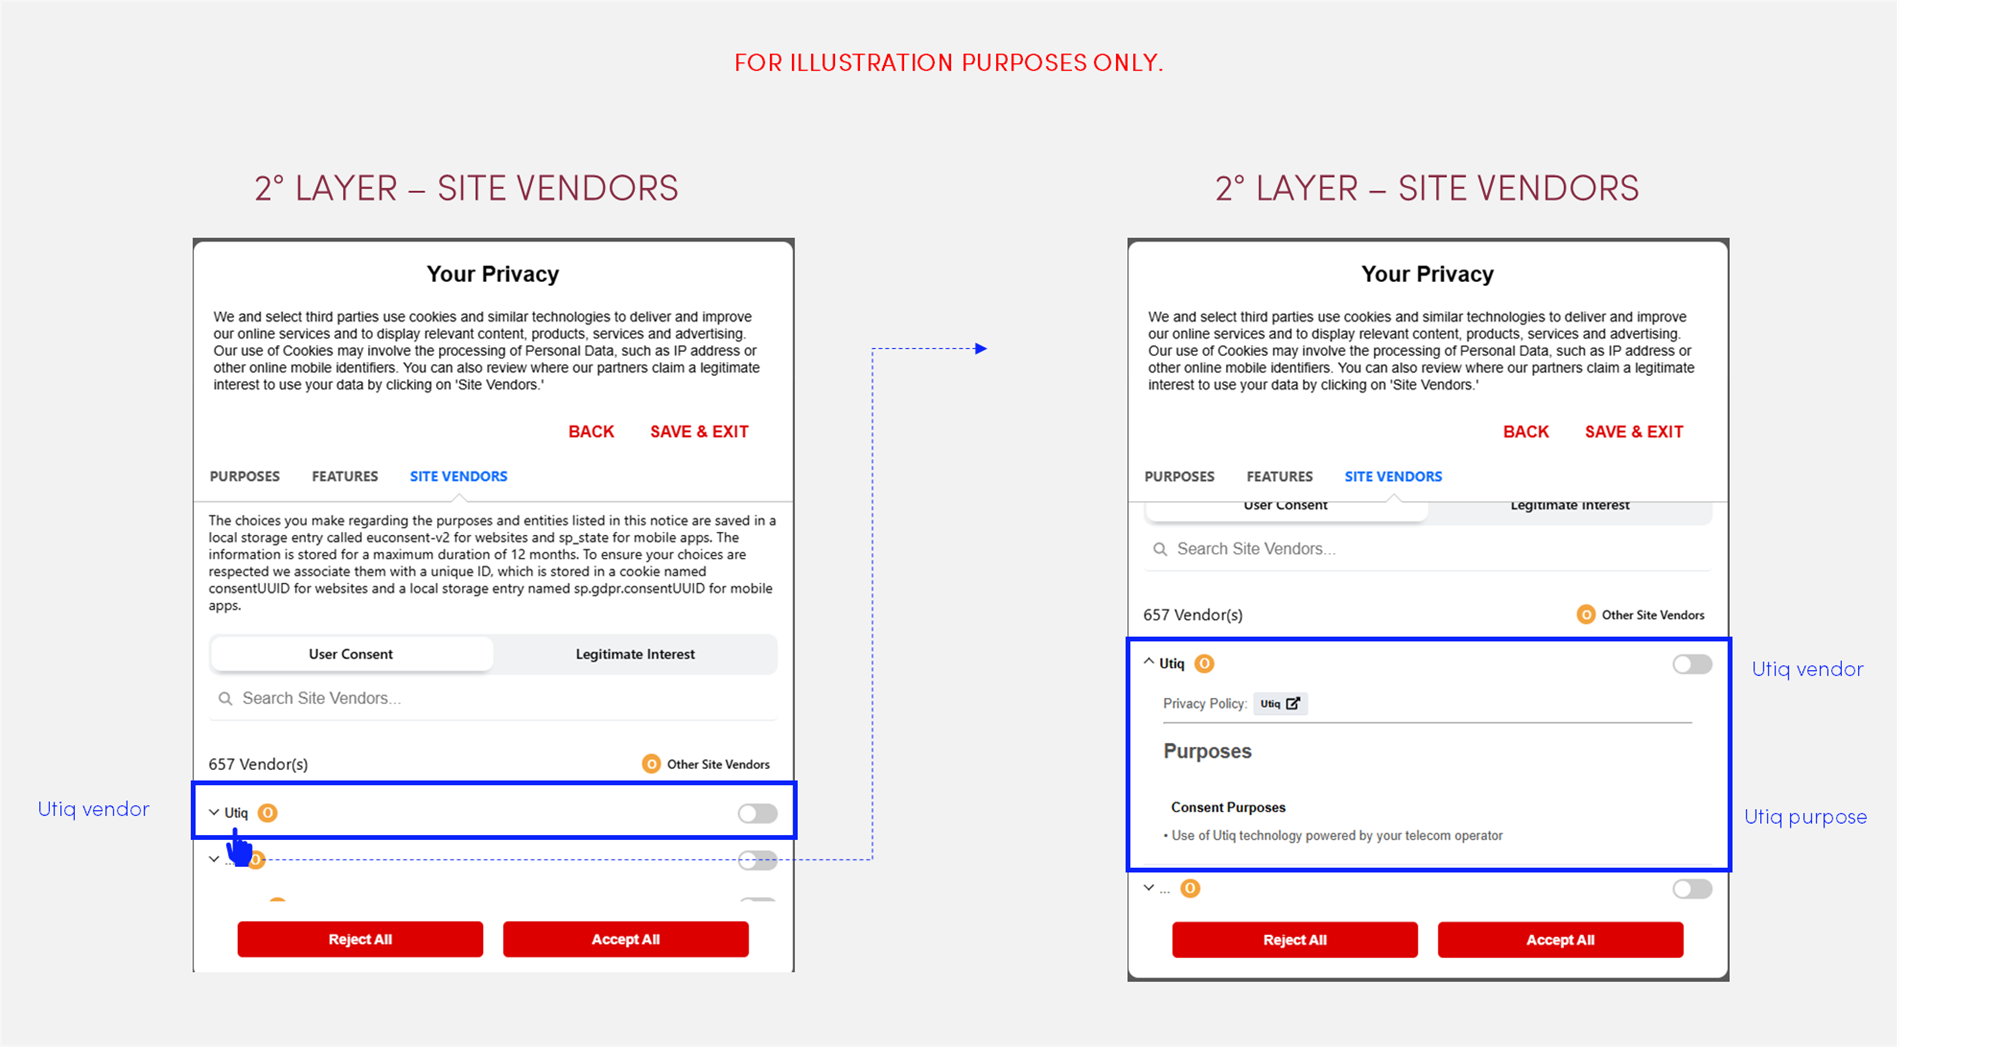
Utiq purpose and Utiq vendor displayed in the 2nd layer of the CMP
Utiq custom purpose
When you configure the Utiq custom purpose, please use the following text:
IMPORTANT NOTE: for Consent or Pay Model integrations only, due to some limitations in Sourcepoint, Utiq adapted some of the text and requirements as described below.
Limitation: The standard requirement specifies that the 1st Utiq consent text could be added in the accordion section, while the 2nd Utiq consent text should be placed in the Utiq custom purpose. However, Sourcepoint currently does not support using two different texts for these layers: both sections must share the same text content.
Solution: To address this limitation, a single, unified text has been created that combines elements from both the 1st and 2nd Utiq consent texts. This mixed version can be used in both sections. The text to be used can be found below:
Use of Utiq technology powered by your telecom operator
If you consent and use a supported internet connection, we, [DATA CONTROLLER], will use marketing identifiers provided by Utiq for advertising or analytics activities. This involves the following:
-
Eligibility check: Utiq uses your IP address to check if you’re using a supported internet connection. If you are not, Utiq will not be activated.
-
Utiq technology activation: Utiq works with your telecom operator, which will use your IP address against internal data (e.g. mobile number), without disclosing it, to help create the marketing identifiers. These are stored in your browser with first party cookies and other device storage information.
-
Sharing and use of identifiers: We use the marketing identifiers to link browsing activity across our property(ies) where Utiq consent is given, including of others using the your same connection, for advertising or analytics purposes. Certain Utiq identifiers are also shared with platforms that work with us and/or Utiq, as part of the advertising or analytics process.
You can reject now in the [BUTTON LABEL TO OPEN THE 2ND LAYER] (click “Reject” for “Use of Utiq technology powered by your telecom operator”) or withdraw consent later via "Manage Utiq" or in Utiq’s privacy portal (“consenthub”). If you “[BUTTON WORDING FOR PAY OPTION]”, Utiq will not be used.
You confirm that you are the connection account holder’ or have permission to activate Utiq.
For more, visit Utiq's privacy statement.
Utiq custom vendor
Utiq consent must be collected both for Utiq custom purpose and for Utiq custom vendor.
The legal basis for Utiq vendor is ‘user consent’ for the Utiq custom purpose.
Utiq vendor needs to be associated to Utiq custom purpose only.
Note on Vendor configuration to ensure consistency:
-
If the website’s CMP is not listing any other vendors (and only listing the purposes), the configuration of “Utiq as vendor” can we omitted.
-
If the website’s CMP is listing other vendors, Utiq must be configured also as a custom vendor.
-
If the website’s CMP is listing other vendors, but without a dedicated toggle to granularly accept or reject each single vendor, Utiq can be configured also as a custom vendor without the granular toggle (for consistency with the other vendors listed).
In such case, an additional sentence should be added to the text: “You can "Reject” for Use of Utiq by rejecting the Utiq purpose "Use of Utiq technology powered by your telecom operator".”
Relate Utiq cookies & storage to Utiq custom vendor
Utiq cookies & storage found here or here must be related to Utiq custom vendor.
Consent Validity Timeframe
The consent validity timeframe (the time after which consent should be re-requested) for Utiq consents for the Integrated Model is aligned with your CMP consent validity timeframe and up to a possible 13 month maximum period.
Technical implementation
Technical steps
Please follow the steps as described here to integrate.
Correct configuration of accept and reject functions
-
The CMP must be configured to ensure that Utiq calls are only triggered if user accepts Utiq consent. This means if the user either clicks on:
-
"accept all" or
-
accept Utiq custom purpose
-
-
Utiq technology must be off by default.
-
No Utiq calls to enable the Utiq technology shall be triggered if a user clicks on reject option.
-
Only strictly necessary cookies can be dropped if user clicks on reject option i.e., consent status.
Utiq consent withdrawal mechanisms
-
3 ways to withdraw Utiq consents:
-
via the CMP: by re-opening the CMP and changing the preferences, the users can withdraw Utiq consent.
-
via the consent revocation dedicated functionality hosted in the Manage Utiq page (see “Set up the user functionalities in the dedicated “Manage Utiq” page”).
-
via consenthub: https://consenthub.utiq.com/
-
Utiq script ensures synchronization CMP-consenthub-Consent withdraw function hosted in Manage Utiq page.
-
Utiq SDK should be loaded on all site pages, to be able to ensure consent synchronisation of the user.
Function not to show main CMP in “Manage Utiq” page
To avoid prompting your CMP in the “Manage Utiq” page, please add the following configuration right before you Sourcepoint tag.
<script>
// Hide the CMP popup in the "Manage Utiq" page
if(window.location.pathname === "<manage_utiq_page_path>") {
  document.head.innerHTML = document.head.innerHTML + '<style>div#sp_message_container_<divId> { display: none !important; } </style>'; // Change <divId> with the respective ID on your CMP wrapping element
}
</script>
Where:
-
<manage_utiq_page_path>is the URL path of the “Manage Utiq” page, e.g. if the page is hosted athttps://<domain>/pages/manage_utiqthen the path would be/pages/manage_utiq -
<divId>is the respective ID on your CMP wrapping element